I love scallops.
And if I had to pick a favorite seafood, it might just be scallops.
They're sweet, tender, have a delicate flavor, and they're quite the versatile little bivalve. Scallops can be baked, poached, seared, broiled, fried, and ceviched.
Today, I'm searing my scallops and serving them on a bed of cauliflower purée with a colorful side of corn, peppers, and tomatoes.
It's gonna be good.
First, I must go into the dry vs wet scallop issue. It bears repeating.
For proper sauteing,
your scallops must be dry.
And by dry,
I mean dry both literally and figuratively.
Literally, I patted the rinsed scallops until they were dry.
Figuratively, the scallops are what we call "dry" scallops,
as opposed to "wet" scallops.
Wet scallops have been injected with a
solution of sodium tripolyphosphate (STP)
which helps the scallops maintain their moisture,
plumps them up,
and gives them a longer shelf life.
It adds extra weight to the scallops
for which you will be paying.
The worst part is the chemical gives the scallops
a milky appearance and no matter how hot
your pan and oil,
you will never be able to brown or sear
these scallops because of all the excess moisture.
The STP also changes the texture of the scallops
(Rubber comes to mind.)
and masks the sweetness and delicacy of their flavor.
Now, those of you who live in the heartland of the country, please, let me know if you can even get dry scallops. You can usually tell the difference by looking at the scallops. Wet scallops will be soaking in a milky-like liquid. Dry scallop liquid is clear. If you don't know and can't tell, always ask the fishmonger. Oh, and for heaven's sake - if you're ever going to make a ceviche, don't even think about using wet.
Now, those of you who live in the heartland of the country, please, let me know if you can even get dry scallops. You can usually tell the difference by looking at the scallops. Wet scallops will be soaking in a milky-like liquid. Dry scallop liquid is clear. If you don't know and can't tell, always ask the fishmonger. Oh, and for heaven's sake - if you're ever going to make a ceviche, don't even think about using wet.
Now, to prepare scallops.
Look for the tough, rubbery foot on the side of the scallop and remove it.
You can peel it off with your fingers or cut it off with a knife.
Discard it or give it to your cat for a special treat.
Look for the tough, rubbery foot on the side of the scallop and remove it.
You can peel it off with your fingers or cut it off with a knife.
Discard it or give it to your cat for a special treat.
Rinse off scallops and pat dry with paper towels. Lightly season with freshly ground pepper.
I don't bother with salt. The scallop's been living in the ocean. It's already salty.
I don't bother with salt. The scallop's been living in the ocean. It's already salty.
We're having seared scallops, a vegetable mélange, and cauliflower purée.
First, the Cauliflower Purée.
I simmered cauliflower florets in lightly salted vegetable broth until tender.
I poured a little of the broth out, saving it for another use, then used an immersion blender to purée the cauliflower.
Add more of the vegetable broth back in as needed, puréeing until you get the consistency you like. I like mine similar to smooth mashed potatoes. Season with unsalted butter, kosher salt, and freshly ground pepper. Sprinkle fresh thyme leaves over top. Cover and keep warm.
Next, the Vegetable Mélange.
A few tablespoons unsalted butter
Onion
Bell pepper (You can use a combination of colors for the pretty.)
Tomato
Jalapeño
Canned corn, drained
A few pinches of sugar
Smoked sea salt
Freshly ground pepper
Chopped cilantro
Blacken the pepper over a flame or under broiler, then submerge in ice water.
Peel off blackened skin and chop pepper.
Chop onion.
Slice jalapeño, removing ribs and seeds.
Peel, seed, and juice tomato.
Melt butter in skillet over medium heat and add onion, pepper, tomato, jalapeño, and corn. Sprinkle in a pinch or two of sugar and toss the vegetables.
Cook a few minutes until onion is tender and everything is heated through.
Season with smoked sea salt, freshly ground pepper, and chopped cilantro.
The smoked sea salt - Alderwood Smoked Sea Salt - was from The Spice and Tea Exchange in Duck. A nice addition to the vegetable medley, the salt intensified the flavor of the smoked pepper.
Sauté the vegetables in butter.
And now on to the scallops!
And now on to the scallops!
Remove the "foot."
Rinse scallops and pat completely dry.
Grind some fresh pepper over the scallops and give them some lemon-zest loving along with some fresh thyme.
Heat a tablespoon each unsalted butter and peanut oil in a skillet over high heat. Add scallops, one at a time, and cook until lightly browned.
About a minute on each side.
Remove scallops from pan.
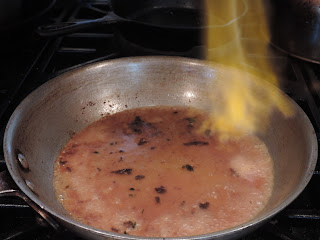
Remove pan from heat, pour a splash of sherry in the pan, and return to heat, tilting the pan to ignite.
About a minute on each side.
Remove scallops from pan.
Remove pan from heat, pour a splash of sherry in the pan, and return to heat, tilting the pan to ignite.
I love a little fire in the kitchen!
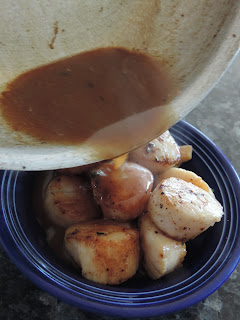
Pour reduced juices over scallops.
Plate scallops and juices on top of cauliflower purée and serve with vegetable medley.
Sprinkle with extra fresh thyme.
Enjoy!
I love pretty food!


